Subscribe For Free Updates!

We'll not spam mate! We promise.

Sunday, May 11, 2014

All way for Getting Started Bloging

Welcome to Blogger! This guide can walk you through how to create a blog, and help you familiarize yourself with the main features of Blogger.
To start using Blogger, simply sign in with your Google Account. (If you use Gmail, Google Groups, or orkut, you already have an account.) If you don't have a Google Account yet, you can create one now.

Contents

  • Create a blog
  • Dashboard
  • Overview
  • Write a post
  • Add an image
  • Add a video
  • Customize
  • Privacy and permissions

Create a blog

To start a blog with Blogger, visit the Blogger homepage, enter your username and password, and click Sign in. Enter a display name and accept Blogger's Terms of Service. Then click the Create a Blog link and get started!
Pick an address (URL) and a blog title. Then, choose your favorite blog template (this is how your blog will look when you publish it). Now get creative, add information to your personal profile, and customize how your blog looks, if you feel up to it. Start blogging now!

Dashboard


Your Dashboard, as always, is your starting point. This is where all your blogs are listed, and you can click on the icons next to them to perform various actions on each blog, such as:
  • Writing a new post: Just click on the orange Pencil icon on your Dashboard to access the Post Editor.
  • Viewing your posts: The gray Post List icon will take you to a list of your published and drafted posts for a specific blog.
  • Catching up on your favorite blogs: Below the list of your own blogs, you’ll see a list of the blogs you follow with an excerpt from their latest posts.
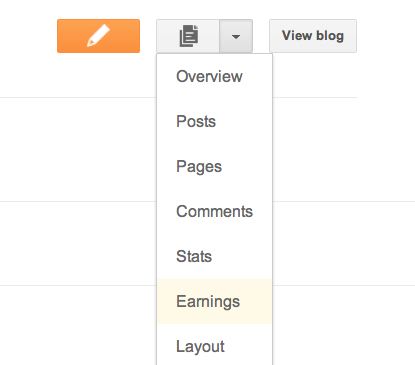
  • Everything else: Check out the drop-down menu next to the Post List icon for a quick link to: 
    • Overview
    • Posts
    • Pages
    • Comments
    • Stats
    • Earnings
    • Layout
    • Template
    • Settings
Note that the Earnings tab will only show if AdSense supports your language.


Overview


Overview

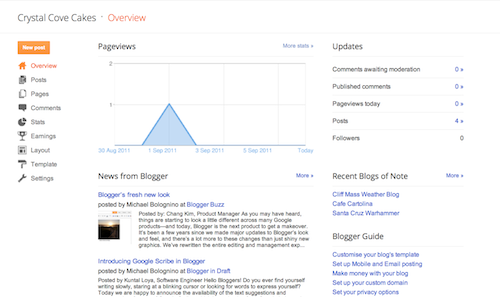
On the Overview tab, you can see your blog’s activity, news and tips from the Blogger team, and recent Blogs of Note.

Write your post

Once you've signed in to Blogger, you'll see your dashboard with your list of blogs. Here's what you need to do:
  1. Click the orange pencil icon to write a new post, and enter anything you want to share with the world.
  2. Next, you'll see the Post Editor page. Start by giving your post a title (optional), then enter the post itself:
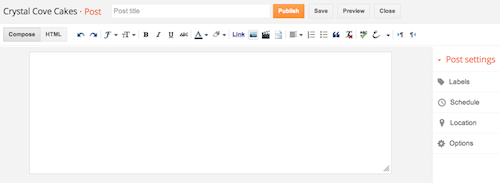

  3. New post
  4. When you're done, click the Preview button at the top to make sure it's ready to go, and then click the Publish button to publish your post.

Add an image

You can add an image from your computer or the Web to your blog. Click the image icon in the Post Editor toolbar. A window appears prompting you to browse for an image file on your computer, or enter the URL of an image on the Web.
Once you've selected your image, you can then choose a layout to determine how your image will appear in your post:
  • The 'Left', 'Center', and 'Right' options allow you to customize the way your blog text will flow around your image.
  • The 'Image size' options will determine how large the image will appear within your post.
Click UPLOAD IMAGES to add your image, and then click DONE when the notification window appears telling you that 'Your image has been added.' Blogger will then return you to the post editor, where you'll see your image ready to be published to your blog.
You can also publish images to your blog using your mobile device, Google's free photo software Picasa, or a third-party service like flickr.

Add a video

To add a video to your blog post, click the film strip icon in the Post Editor toolbar above where you compose your blog text. A window appears prompting you to 'Add a video to your blog post.'
Click Browse to select the video file from your computer that you'd like to upload. Note that Blogger accepts AVI, MPEG, QuickTime, Real and Windows Media files and that your video must be less than 100MB in size.
Before uploading your video, add a title in the 'Video Title' box and agree to the Terms and Conditions (you'll only have to do this the first time that you upload a video with Blogger). Then click UPLOAD VIDEO.
While your video uploads, you'll see a placeholder in the post editor showing where your video will appear. You'll also see a status message below the post editor letting you know that your upload is in progress. Depending on the size of your video, this usually takes about five minutes. When it is complete, your video will appear in the post editor.

Customize

Your template is a fun way to customize your blog. When creating a new blog, you're first asked to choose a default template, this is the basic design of your blog. You can choose from many templates for your blog; simply pick the one that best fits your needs.
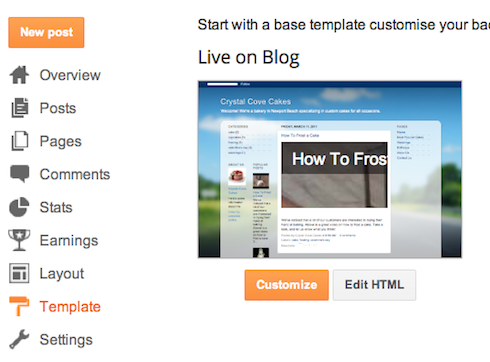


Template"

Once on the Template tab, you can either click on the orange Customize button to get started with our easy-to-use WYSIWYG (“What you see is what you get”) template designer, or choose one of our many default templates. If you’d like to edit the HTML of your blog, just click the gray Edit HTML button.
In addition, you can customize your blog's design using our intuitive drag-and-drop interface. You can also add powerful gadgets such as slideshows, user polls, or even AdSense ads. If you want more precise control over your blog's layout, you can also use the Edit HTML feature. To edit your blog's layout, follow these 
 
 
steps:
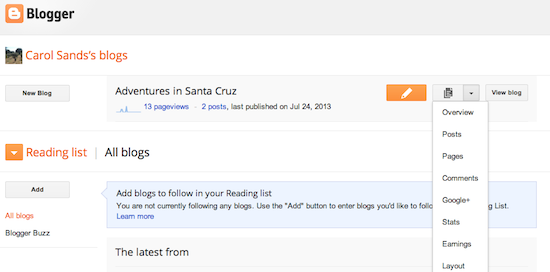
  1. Click Layout from the drop-down menu on your dashboard below the blog you would like to customize.
  2. From there, click Edit to edit existing gadgets, or Add a Gadget to add new ones.
  3. To add a new gadget after you've clicked Add a Gadget, simply click the plus sign next to your desired gadget. You can choose from gadgets by category, or search for a specific gadget in the top right of the pop-up window.
  4. add_gadget
  5. Once you've added the necessary information to your selected gadget, click the orange Save arrangement button. Your layout changes will appear instantly.

Privacy and permissions

By default, your blog is completely public, and can be read by anyone on the internet. However, if you want to keep it private, you can do that, too. You can change these settings on the Settings | Basic tab.
Permissions and Privacy
  1. Under the 'Blog Readers' section, you'll probably see 'Anybody' selected as the default. When you change this to 'Only these readers,' you'll get an Add Readers button.
  2. Click the Add Readers button and then enter the email address of a person to whom you'd like to grant access to your blog. To add multiple people, separate their addresses with commas.
  3. For each address entered, the Google Account associated with that address will be given access to view your blog. If an address is not associated with an account, that person will receive an invitation email with a link allowing them do one of three things:
    • Sign in to an existing account.
    • Create a new account.
    • View your blog as a guest (no account required).

About the Blogger "Earnings" details

The Earnings tab in Blogger makes it easy to enable AdSense ads on your blog. Once your account has been approved, Blogger retrieves your earnings data so you don't need to visit the AdSense dashboard to access basic earnings information.

 
 AdSense Report
Once you start generating AdSense impressions, you'll begin earning money when people click on ads that appear on your blog. To see earnings information, go to your Earnings tab and click on the "View Dashboard" link.
All time
If you're an existing AdSense user, you'll notice that Blogger created a new channel (with the URL of your blog) in your account. If you have had AdSense ads on your blog before using Blogger’s AdSense integration to insert ads into your blog, note that All time will retrieve data only from the time you connected Blogger to your AdSense account.
This does not affect your overall AdSense reporting, available directly from AdSense.
Terminology
The AdSense report visible from the Earnings tab contains basic information about how many ads have run on your blog, how many clicks were generated, and how much revenue you've earned. Each term in the report is defined below:
  • Page views: A page view is generated every time a user views a page displaying Google ads. We'll count one page view regardless of the number of ads displayed on that page. For example, if you have a page displaying three ad units and it's viewed twice, you'll generate two page views and six ad unit impressions.
  • Clicks: The number of times the ads were clicked on in the given reporting period.
  • Page CTR (Click-through rate): The number of ad clicks divided by the number of page views.
  • CPC (Cost per click): The average amount paid by the advertisers for each ad click.
  • Page RPM (Revenue per mille): This is revenue per 1,000 page views. RPM = (Page views x CTR x CPC) / 1,000
For more information please check out the AdSense Help Center.

How to Enable at Google AdSense on your blog


You can make money with your blog by enabling AdSense. AdSense is Google's content-targeted advertising program. If you use AdSense, relevant ads will automatically be shown based on what your posts are about. For example, if you blog about baseball, you might see ads for “Major League Baseball memorabilia” next to your post. If you blog about painting, you might see ads for “Art Supplies.”

Enable AdSense for your blog

  1. Click on the Earnings tab from the drop-down menu on your dashboard.
  2. Earnings tab from the drop-down menu
  3. You’ll then see the AdSense overview page. If you haven’t signed up for AdSense yet, click Sign up for AdSense.
  4. Select whether you'd like AdSense on the Google Account you're currently signed in to, or if you'd like to create a new Google Account.
  5. Complete the application form, review the information you've provided, and then agree to terms and conditions.
Ads will not appear on your blog until your application has been approved. Once you receive confirmation that your application was approved, you can control the ways the ads show up on your blog through the settings on the Earnings tab at anytime. It’s up to you whether or not to show ads, and where on your blog to display those ads (sidebar and posts, just sidebar, or just posts) if you’re using Traditional templates. Dynamic Views users can skip this step, as we’ve already optimized ad placement for Dynamic Views templates.

Thursday, September 24, 2009

Using Chitika eMiniMalls With Adsense

Using Chitika eMiniMalls With Adsense
Many of the questions I’ve received about eMiniMalls related to whether they can be used on the same page as Google Adsense ads. As I wrote in my review - this was initially of major concern a number of us when we first came across eMiniMalls. As a result, one of my colleagues wrote an email to Adsense for clarification. The response was that it was allowable from the perspective of Adsense to use Chitika eMiniMalls on the same page as Adsense in the following circumstances (I’m told by a YPN publisher that this is also true with YPN):
1. eMiniMalls must be made to be NON-contexual
2. eMiniMalls must have their ’search tab’ disabled IF you choose to use the Adsense Search option (update: I’ve since heard from a number of Chitika eMiniMall publishers who say that they’ve recieved confirmation from Adsense that they ARE ALLOWED to use the search tab in eMiniMalls).
This was great news as it added another revenue stream to the sites of many without compromising another important source of income like Adsense.
NB: Chitika has another ad system, called RealContext, that is NOT allowed to be used in conjunction with Adsense - don’t get them mixed up.
It is worth noting that different webmasters and bloggers have seen difference results from using Adsense and Chitika’s eMiniMalls on the one page. These results have included:

Some bloggers have reported small decreases in their Adsense earnings. This is my experience - I’ve noticed a 5-10% decrease in my overall Adsense earnings since adding eMiniMalls. Of course this is considerably less than the overall increase in earnings that the eMiniMalls have brought me so I’m willing to take this hit knowing that overall I am in a considerably better financial position. A smaller number of bloggers have noticed increases in their Adsense earnings when they replaced one of multiple Adsense Ad units with a eMiniMall unit. This sounds crazy - bit it makes sense when you realise that sometimes less Adsense Ad units on a page can result in increase click values for some ads (thats another topic for another day)
- Some have found eMiniMalls to be so well suited to their site’s that they’ve removed Adsense altogether and are just running the Chitika ads (I wouldn’t recommend doing this straight away without testing things first).

What sites are Chitika eMiniMalls Best on?


In my experience so far with Chitika (and from interacting with many others who are testing it) I’ve found that it seems to work best on sites that are focused upon products. Many gadget sites have signed up for eMiniMalls already but by no means are their ads limited to consumer electronics. I’ve seen relevant ads served up on a variety of sites including some focussing upon clothes, baby strollers, washing machines, jewellery and other fashion items. From what I can see - they seem to have a large supply of ads for most of the products you’ll find on sites like Amazon and Shopping.com (which is thousands of products).


Product related sites are not the only ones reporting good returns from eMiniMalls though - I know of a variety of personal and general topic blogs and sites that are reporting better than normal earnings with eMiniMalls in comparison to other ad networks that they use.

What sites are Chitika eMiniMalls Best on?
In my experience so far with Chitika (and from interacting with many others who are testing it) I’ve found that it seems to work best on sites that are focused upon products. Many gadget sites have signed up for eMiniMalls already but by no means are their ads limited to consumer electronics. I’ve seen relevant ads served up on a variety of sites including some focussing upon clothes, baby strollers, washing machines, jewellery and other fashion items. From what I can see - they seem to have a large supply of ads for most of the products you’ll find on sites like Amazon and Shopping.com (which is thousands of products).
Product related sites are not the only ones reporting good returns from eMiniMalls though - I know of a variety of personal and general topic blogs and sites that are reporting better than normal earnings with eMiniMalls in comparison to other ad networks that they use.

Chitika eMiniMall Sign up Process

Chitika eMiniMall Sign up Process
Signing Up for Chitika eMiniMalls is pretty easy to do. Simply visit their sign up page and fill in your details. Keep in mind their terms and conditions of being a publisher which exclude certain types of sites. When you send in your application you will normally hear back from Chitika with a response within 24 hours (time seems to depend upon what time you apply and whether it is business hours in their part of the US.
Keep in mind that in signing up you are being bound to their terms and conditions that include non-disclosure of some of your earnings information (eg CTR, click values etc). Also note that at this point of their beta test they are only accepting sites written in English.
Lastly keep in mind that if your site’s readership is mainly from Asian countries that unfortunately due to a lack of Asian merchants and low conversions Chitika does not pay out for all Asian countries and the ‘auditing’ process could decrease your earnings considerably.

A Guide to Getting increasing your income from Chitika’s eMiniMall Advertising program.

Since my initial Chitika eMinimalls review and revelation of earnings from Chitika’s eMiniMalls my inbox has been full of questions on how to use eMiniMalls effectively. As a result I thought I’d write a guide to using Chitika eMiniMalls to refer people to. I hope this is helpful. Feel free to add your own tips in comments below.

Sunday, September 20, 2009

Way No-3

Write reviews for affiliate Products
Another way to earn with blogging is to start writing your own reviews or posts on different affiliate products. In an action (e.g sale or lead) you can get a good amount of commission from your affiliate advertiser. You can sign up for commission junction, neverblueads or some other good affiliate networks and find the product you can write on, and promote. A good and helpful review always returns something. People make plenty of money by running web hosting blogs, health & fitness blogs etc.

Way No-2

Write reviews for other blogs
This is another good way to earn with blogging. You can go to some best review sites like sponsoredreviews, payperreview, reviewme etc. Then sign up as blogger and start writing reviews or posts on a topic of advertiser’s choice and give them two or three link backs. This way you get two things. One is the few dollars for writing reviews for advertisers and second is the update of your blog. Yeah , your blog is always up to date to get more traffic from Google and other search engines.

Followers